MATLAB Command Line
Click to copy the following command line to the clipboard. Then paste it in the MATLAB Command Window:
quarc_i2c_temperature_sensor_demoQUARC I2C Temperature Demo
This is a simple example of using an I2C device with QUARC. It interfaces with a simple temperature sensor. Since the sensor does not require combined write and read operations in a single I2C bus transaction, this example does not use the Stream Write-Read block that some I2C sensors require.
System Requirements
This demonstration is run using the QUARC Linux DuoVero target. To use QUARC for Linux DuoVero, a Quanser challenge employing this target, such as the QBall-2 or QBot-2, is required, as well as a software license for the Linux DuoVero target.
For a detailed discussion on the QUARC Linux DuoVero target and requirements needed to run models on this target, please refer to the QUARC Linux DuoVero Target reference page.
This example also requires an MCP9800/1/2/3 temperature sensor from Microchip Technology Inc., wired to I2C port 0 of the target. The VDD pin of the temperature sensor should be wired to +3.3V and the GND pin should be wired to ground. The SCLK pin should be wired to the serial clock (SCL) of the I2C port and the SDA pin should be wired to the serial data line (SDA) of the I2C port. For the MCP9801 and MCP9803, which support a configurable slave address, the A0, A1 and A2 pins should all be grounded to set the least-significant bits of the slave address to zero. Note that the base slave address of the MCP9800 series is 0x48 or 0b1001000. See the datasheet for details.
Configuring the Demonstration
Open the QUARC Preferences dialog by selecting from the menu of one of the Simulink diagrams.
Select linux_duovero as the Target type on the Model pane. Then change the IP address
in the Default model URI parameter to match your Linux DuoVero. For example, if your target
has an IP address of 172.16.0.155, then the Default model URI should be
tcpip://172.16.0.155:17001?nagle=no
.
A hostname may be used instead of the IP address if the target is configured
with a hostname. The concept of URI's and their use in communications is discussed in
Communicating with the Target .
In this example, communications between Simulink and the model will occur using TCP/IP. This step configures the default communications
scheme used with the Linux DuoVero target and does not have to be repeated unless the
address of the target changes.
The slave address of the URI used by the Stream Call block must match the slave address configured for the temperature sensor on its A0, A1 and A2 pins. If these pins are grounded then the address should be 0x48 or 0b1001000. Otherwise the slave address will need to be changed to 0b1001xxx where xxx is the A2, A1, A0 values respectively.
To change the URI of the Stream Call block, double-click on the block to open its configuration dialog, as shown below.
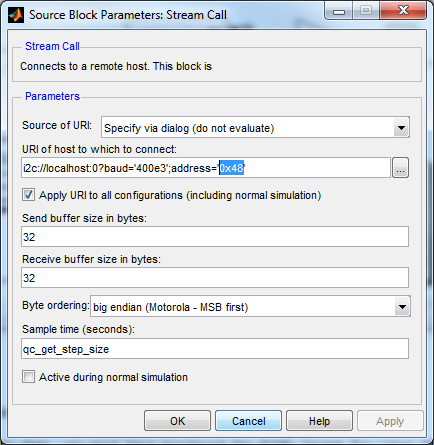
In the URI of host to which to connect field, replace the value of the address option in the URI with the appropriate slave address.
Click OK to close the configuration dialog.
Running the Model Using the QUARC Target for Linux DuoVero
Please note that in order to be able to run this part of the demo, you must have purchased the QUARC Target for Linux ARM as part of your license. In addition you must have satisfied the software and hardware requirements found in the QUARC Installation Guide. This target is used, for example, with the Quanser QBall-2 and QBot-2.
To open the model click on the "Open this model" button found on the top right corner of this page.
Select from the menu of the diagram, or select from the simulation mode combo box on the toolbar.
Select from the menu of the diagram, or press Ctrl+B while the diagram is the active window. A great deal of output will appear in the Diagnostic Viewer about the progress of the build. If you cannot see the Diagnostic Viewer, you can open it by selecting from the menu of the diagram, or clicking on the View Diagnostics hyperlink at the bottom of the diagram. If you have MATLAB R2013b or earlier then the output will appear in the MATLAB Command Window.
If the build is successful, then the line:
*** Created executable quarc_i2c_temperature_sensor_demo.rt-linux_duovero
will appear in the Command Window. Finally, QUARC will download the model to the QUARC Target for Linux DuoVero. The line:
### Model quarc_i2c_temperature_sensor_demo has been downloaded to target 'tcpip://192.168.0.155:7000' (126729 bytes)
will appear in the Command Window indicating that the code was successfully downloaded to the QUARC Target. The IP address will match the IP address of your Linux DuoVero target. If any errors occur, appropriate error messages will appear in the Command Window.
Double click on the Temperature (°C) block to open the Scope.
Click on the button or select from the menu of the diagram to connect to the model.
Start the model by clicking on the button or selecting from the menu of the diagram. The item of the menu may also be used to both connect and start the model in one operation.
A straight line will appear matching the ambient temperature in the Scope as shown below. Breath on the sensor to increase the temperature of the sensor and see the corresponding increase on the Scope. Notice that the Scope trace is moving in actual time. In other words, the trace passes the 10 second mark after 10 seconds have passed since in external mode, QUARC runs the model in real-time.
Click on the button or select from the menu of the diagram to stop the model. The item of the menu may also be used.
Running the example on a different target
To run the example on a different target, refer to the instructions on the Running QUARC Examples on Remote Targets page.
Copyright ©2026 Quanser Inc. This page was generated 2026-05-13. Submit feedback to Quanser about this page.
Link to this page.